Thursday, December 22, 2011

12 Days of Christmas Blog Hop- Day 12

Hey Crafty Friends-
For my final project I pulled out the Cricut and cut a snowflake for my focal point. SNOWMANY HUGS CARD!


I layered the snowflake over 2 different snowflake patterned paper and finished off the card with twine and the Snowmany Hugs stamp from My Creative Time. Simple and sweet!
Well we have come to the end of the hop. I hope you enjoyed my projects as much as I enjoyed making them. MERRY CHRISTMAS!
2. Theresa ~ http://www.thescrapbookingqueen.com/
3. Ashley ~ http://theglamoroussideofscrapping.blogspot.com
4. Anita ~http://www.anitaandbugs.blogspot.com
5. Amy Jo ~ http://lv2scrapandfibrofacts.blogspot.com
6. Lynda ~ http://memoriesintyme.blogspot.com/
7. Mindy ~ http://papercreationsbymindyblog.blogspot.com/
8. Janet ~ http://ladyluvbug.blogspot.com/
9. Nicolette ~ www.beyondscrapin.blogspot.com
10. Shawnee ~ http://www.blessedonthebrightside.com
11. Inga http://mommahobbit.blogspot.com/
12. Tami ~ http://tamboscreations.blogspot.com/
13. Kerri ~ http://crafttimeandcupcakes.blogspot.com

Wednesday, December 21, 2011

12 Days of Christmas Blog Hop - Day 11

Only 2 days left and I made so many "projects" so i decided to go with a card for this one. I LOVE IT!
 I used DCWV Mrs. Claus' Kitchen for the card. I added white cardstock punched with Martha Stewart's Doily punch. Used dimensional stickers for the gingerbread man and frosting bag. I found theses cute little "cookie cutter" buttons at Hobby Lobby. Added some ribbon and twine. And finally used Stampin Up Curly Cute stamp set to emboss the sentiment in white. I'm really happy with how it came out. Thanks for stopping by!

2. Theresa ~ http://www.thescrapbookingqueen.com/
3. Ashley ~ http://theglamoroussideofscrapping.blogspot.com
4. Anita ~http://www.anitaandbugs.blogspot.com
5. Amy Jo ~ http://lv2scrapandfibrofacts.blogspot.com
6. Lynda ~ http://memoriesintyme.blogspot.com/
7. Mindy ~ http://papercreationsbymindyblog.blogspot.com/
8. Janet ~ http://ladyluvbug.blogspot.com/
9. Nicolette ~ www.beyondscrapin.blogspot.com
10. Shawnee ~ http://www.blessedonthebrightside.com
11. Inga http://mommahobbit.blogspot.com/
12. Tami ~ http://tamboscreations.blogspot.com/
13. Kerri ~ http://crafttimeandcupcakes.blogspot.com

Tuesday, December 20, 2011

12 Days of Christmas Blog Hop - Day 10

Hey Crafty Friends-

With it coming down to the wire I decided to once again go with a simple craft idea that will please my kids. WRAPPED CHOCOLATE BARS!


Wrap your bar in decorative paper of choice. Add ribbon, a tag, a bow, and some bling and you are finished. Kiddos will love it. Make an ordinary gift special!

Monday, December 19, 2011

12 Days of Christmas Blog Hop - Day 9

Hey Crafty Friends-

For today's project I decided to create something to help me with my Christmas wrapping. A
GIFT CARD HOLDER


I used the same design that I did for a Christmas card that I loved and turned it into a gift card holder shaped like a present. It's very simple. Just make a pocket for the bottom and a more narrow pocket for the top that's slightly longer than the bottom using cardstock of your choice. Embellish with a bow, stickles, brads, or whatever you like.


When you remove the top from your "present" the gift card will be revealed. This card happens to be attached to a card base but you can do the same thing for credit card sized cards just by sizing down.
I hope you enjoyed today's project.....Thanks for stopping by!

3. Ashley ~ http://theglamoroussideofscrapping.blogspot.com
4. Anita ~http://www.anitaandbugs.blogspot.com
5. Amy Jo ~ http://lv2scrapandfibrofacts.blogspot.com
6. Lynda ~ http://memoriesintyme.blogspot.com/
7. Mindy ~ http://papercreationsbymindyblog.blogspot.com/
8. Janet ~ http://ladyluvbug.blogspot.com/
9. Nicolette ~ www.beyondscrapin.blogspot.com
10. Shawnee ~ http://www.blessedonthebrightside.com
11. Inga http://mommahobbit.blogspot.com/
12. Tami ~ http://tamboscreations.blogspot.com/
13. Kerri ~ http://crafttimeandcupcakes.blogspot.com


Sunday, December 18, 2011

12 Days of Christmas Blog Hop - Day 8

Hey Crafty Friends-

Another pink and blue Christmas idea. This layout was really fun to do. I love snowflakes....can you tell?


I used a some papers and chipboard frames I had and added a few digital images I printed from Pink Paislee's blog. They recently hosted a Winter Wonderland Blog Event and had great project ideas and free downloads. I hope you like the layout and thanks for stopping by.

2. Theresa ~ http://www.thescrapbookingqueen.com/
3. Ashley ~ http://theglamoroussideofscrapping.blogspot.com
4. Anita ~http://www.anitaandbugs.blogspot.com
5. Amy Jo ~ http://lv2scrapandfibrofacts.blogspot.com
6. Lynda ~ http://memoriesintyme.blogspot.com/
7. Mindy ~ http://papercreationsbymindyblog.blogspot.com/
8. Janet ~ http://ladyluvbug.blogspot.com/
9. Nicolette ~ www.beyondscrapin.blogspot.com
10. Shawnee ~ http://www.blessedonthebrightside.com
11. Inga http://mommahobbit.blogspot.com/
12. Tami ~ http://tamboscreations.blogspot.com/
13. Kerri ~ http://crafttimeandcupcakes.blogspot.com

Saturday, December 17, 2011

12 Days of Christmas Blog Hop - Day 7

Hey Crafty Friends-

Does Christmas have to be red and green....NO WAY! How about sweet pink and blue snowflakes on a CUPCAKE TOPPER!


I started with a snowflake tag and jazzed it up a bit. I added the pink snowflake in the center, popped up on a foam dot. Then popped the whole thing up on top of pink glitter cardstock. The edges were inked slightly for dimension. A little bling and some stickles to glitz it up. And finally a double twine bow at the top. Glue it to a toothpick and you have the perfect topper for your cupcakes!

2. Theresa ~ http://www.thescrapbookingqueen.com/
3. Ashley ~ http://theglamoroussideofscrapping.blogspot.com
4. Anita ~http://www.anitaandbugs.blogspot.com
5. Amy Jo ~ http://lv2scrapandfibrofacts.blogspot.com
6. Lynda ~ http://memoriesintyme.blogspot.com/
7. Mindy ~ http://papercreationsbymindyblog.blogspot.com/
8. Janet ~ http://ladyluvbug.blogspot.com/
9. Nicolette ~ www.beyondscrapin.blogspot.com
10. Shawnee ~ http://www.blessedonthebrightside.com
11. Inga http://mommahobbit.blogspot.com/
12. Tami ~ http://tamboscreations.blogspot.com/
13. Kerri ~ http://crafttimeandcupcakes.blogspot.com

12 Days of Christmas Blog Hop - Day 6

This treat is a little simpler than some of my others but is perfect for making in bulk for children's school parties or Christmas party favors. SNOWFLAKE SUCKERS


I cut a snowflake at 2 inches from the Winter Lace Cricut cartridge using gray and blue glitter paper. Layered them together and embellished with clear stickles. I then used a glue dot to stick a sucker on the back of the snowflake. Covered it with a cellophane bag and tied a bow out of striped cord. A cute, simple way to jazz up your lollipops! 

12 Days of Christmas Blog Hop - Day 5

Hey Crafty Friends-

I've been keeping with the "treats" theme a lot this holiday season. I guess because I have small kids it has become my favorite craft to create. Today I decided to make a TREAT BAG TOPPER!


I used M&Ms in my bag but I think any treat would look great with this topper . I stamped a gingham pattern in green on craft cardstock then inked the edges with Tim Holtz Festive Berries. I cut the pine cone from the CTMH Art Philosophy Cricut Cartridge and glued it to down on top of some holly trim I found at Walmart. I tied my checked bow and stamped my sentiment from the Stampin Up Curly Cute set. And finally a pearl heart for extra cuteness. Give it a try....it's sure to impress!

2. Theresa ~ http://www.thescrapbookingqueen.com/
3. Ashley ~ http://theglamoroussideofscrapping.blogspot.com
4. Anita ~http://www.anitaandbugs.blogspot.com
5. Amy Jo ~ http://lv2scrapandfibrofacts.blogspot.com
6. Lynda ~ http://memoriesintyme.blogspot.com/
7. Mindy ~ http://papercreationsbymindyblog.blogspot.com/
8. Janet ~ http://ladyluvbug.blogspot.com/
9. Nicolette ~ www.beyondscrapin.blogspot.com
10. Shawnee ~ http://www.blessedonthebrightside.com
11. Inga http://mommahobbit.blogspot.com/
12. Tami ~ http://tamboscreations.blogspot.com/
13. Kerri ~ http://crafttimeandcupcakes.blogspot.com

Wednesday, December 14, 2011

12 Days of Christmas Blog Hop - Day 4

Hey crafty friends-
Today I decided to let my kids in on the crafty fun. They are 2 1/2 and almost 4, and have started to show interest in my crafting so i picked up something fun and simple for them. This way they can give something to family members for Christmas. FUN FOAM TAGS!


I found these cute little Christmas tree foam pieces with all the ornaments and stars included. They peeled and stuck the embellishments on and I tied a twine bow and hanger.


I stamped to and from on the back turning them into gift tags. There you have it! My kids' crafty work. I know it's not pro but I thought it was blog worthy!

2. Theresa ~ http://www.thescrapbookingqueen.com/
3. Ashley ~ http://theglamoroussideofscrapping.blogspot.com
4. Anita ~http://www.anitaandbugs.blogspot.com
5. Amy Jo ~ http://lv2scrapandfibrofacts.blogspot.com
6. Lynda ~ http://memoriesintyme.blogspot.com/
7. Mindy ~ http://papercreationsbymindyblog.blogspot.com/
8. Janet ~ http://ladyluvbug.blogspot.com/
9. Nicolette ~ www.beyondscrapin.blogspot.com
10. Shawnee ~ http://www.blessedonthebrightside.com
11. Inga http://mommahobbit.blogspot.com/
12. Tami ~ http://tamboscreations.blogspot.com/
13. Kerri ~ http://crafttimeandcupcakes.blogspot.com

Tuesday, December 13, 2011

12 Days of Christmas Blog Hop - Day 3

Hi crafty friends,
Today I have another project I started doing years ago and I love it so much I still use it every year.
RIBBON CANDY ORNAMENTS!


These are so easy to make and they end up on my tree every year. I usually don't even measure the length of the ribbon, I just keep looping until I think the length is right. Basically just thread your needle and tie a knot at the end. Then making sure you keep the loops about the same size (I keep them about an inch long) just fold, but do not crease, the ribbon back and forth and place the needle through the center one loop at a time. Between each loop place a bead of your choice. When it looks like the right length for you just place the final bead, tie it off and cut off the excess ribbon. Add an ornament hook and you're ready to hang. Give it a try....it really looks nice on the tree!

2. Theresa ~ http://www.thescrapbookingqueen.com/
3. Ashley ~ http://theglamoroussideofscrapping.blogspot.com
4. Anita ~http://www.anitaandbugs.blogspot.com
5. Amy Jo ~ http://lv2scrapandfibrofacts.blogspot.com
6. Lynda ~ http://memoriesintyme.blogspot.com/
7. Mindy ~ http://papercreationsbymindyblog.blogspot.com/
8. Janet ~ http://ladyluvbug.blogspot.com/
9. Nicolette ~ www.beyondscrapin.blogspot.com
10. Shawnee ~ http://www.blessedonthebrightside.com
11. Inga http://mommahobbit.blogspot.com/
12. Tami ~ http://tamboscreations.blogspot.com/
13. Kerri ~ http://crafttimeandcupcakes.blogspot.com

Monday, December 12, 2011

12 Days of Christmas Blog Hop - Day 2

Today I wanted to bring you a sweet little treat perfect for a "cookie" or treat swap. The first time I made these for a holiday party they were gone. The kids especially loved them. CANDY CANE HEARTS!

Place 2 small candy canes together in the shape of a heart on top of wax paper or foil. Take white candy melts in a piping bag or plastic bag and microwave until melted. Pipe the melts into the center of the heart and let it set until firm. The chocolate will hold the candy canes together.


I wrapped it in a cellophane bag, tied it with a twine double bow, then stamped a simple tag. There you have it. A cute little treat with a big impact. Please check in tomorrow for more Christmas ideas!

2. Theresa ~ http://www.thescrapbookingqueen.com/
3. Ashley ~ http://theglamoroussideofscrapping.blogspot.com
4. Anita ~http://www.anitaandbugs.blogspot.com
5. Amy Jo ~ http://lv2scrapandfibrofacts.blogspot.com
6. Lynda ~ http://memoriesintyme.blogspot.com/
7. Mindy ~ http://papercreationsbymindyblog.blogspot.com/
8. Janet ~ http://ladyluvbug.blogspot.com/
9. Nicolette ~ www.beyondscrapin.blogspot.com
10. Shawnee ~ http://www.blessedonthebrightside.com
11. Inga http://mommahobbit.blogspot.com/
12. Tami ~ http://tamboscreations.blogspot.com/
13. Kerri ~ http://crafttimeandcupcakes.blogspot.com/

Sunday, December 11, 2011

12 Days of Christmas Blog Hop - Day 1

Hey Crafty Friends-
I am very happy to be a part of the 12 Days of Christmas Blog Hop hosted by Honey Bearz Designs. This card is one of my favorites I have ever made. The beauty is really in the sparkle that doesn't come across well on camera. I hope you like it as much as I do.


It is a 5 1/2 inch square base cut from white glitter cardstock. I used the Martha Stewart snowflake punch to cut six snowflakes from lavender glitter cardstock and layered it on top of the white. I layered a strip of the same lavender stamped with "It's a Wonderful Life" on top of black and popped it up on foam dots in the center of the card. Added a tulle bow at the top and a couple rhinestones and there you have it.......My favorite snowflake card.


 Thank you for stopping by. I hope you will follow me for the rest of the hop! 11 more days to go.


2. Theresa ~ http://www.thescrapbookingqueen.com/
3. Ashley ~ http://theglamoroussideofscrapping.blogspot.com
4. Anita ~http://www.anitaandbugs.blogspot.com
5. Amy Jo ~ http://lv2scrapandfibrofacts.blogspot.com
6. Lynda ~ http://memoriesintyme.blogspot.com/
7. Mindy ~ http://papercreationsbymindyblog.blogspot.com/
8. Janet ~ http://ladyluvbug.blogspot.com/
9. Nicolette ~ www.beyondscrapin.blogspot.com
10. Shawnee ~ http://www.blessedonthebrightside.com
11. Inga http://mommahobbit.blogspot.com/
12. Tami ~ http://tamboscreations.blogspot.com/
13. Jearise ~ http://lorbysworld.blogspot.com/
14. Kerri ~ http://crafttimeandcupcakes.blogspot.com/

Sunday, December 4, 2011

Pine cone Die Cut

Hey Crafty Friends-
After following Tim Holtz 12 tags of Christmas I too really wanted to get my hands on the Tattered Pine cone die. But then I thought with all the Cricut cartridges I own I should have something that would work. On page 69 of the Art Philosophy Close to my Heart cartridge I found it!

The spiral that is on the right of the font box will make a great pine cone. I cut it at 3 inches to make a small pine cone suitable for a card. The base "curl" that you would glue the spiral to is a little too big because you want it to be wrapped tighter to keep the shape so I glued it to where I thought it looked good and trimmed off the excess.

I didn't do any distressing or adding "snow" yet but I think it looks pretty good. I plan to make a few more with different papers and try resizing it. I will be using these for an upcoming project this month so I'll share more then. Thanks for checking in!

Market Street Stamps Block Party

I was so excited to hear about the block party the day after I received my first stamps from Market Street Stamps. I am so happy with how this Christmas card turned out. I LOVE MY GINGHAM BACKGROUND STAMP!  Fingers crossed I get to be a guest designer.


P.S. I changed the photo to one in better lighting. I think it looks better anyway. Thanks for stopping by!

Saturday, December 3, 2011

Christmas Cards & Cookies Blog Hop

Hey Crafty Friends,
I decided for this hop I had to make Chocolate Candy Cane Cookies. So easy to make and they give you such a Christmasy feeling!


The card is a simple 3.5 inch card. Green cardstock layered with a holly leaf patterned paper that has been inked on the edges with Tim Holtz Festive Berries ink then stamped with my favorite My Creative Time stamps. A bow on top finished off this cute little Christmas gift!


Cookie Ingredients

  • 4 cups (two 12-oz. pkgs.) NESTLÉ® TOLL HOUSE® Semi-Sweet Chocolate Morsels, divided
  • 2 2/3 cups all-purpose flour
  • 1 teaspoon baking soda
  • 1 teaspoon salt
  • 1 cup (2 sticks) butter or margarine, softened
  • 1 cup packed brown sugar
  • 1/2 cup granulated sugar
  • 1 teaspoon vanilla extract
  • 3 large eggs

Directions

PREHEAT oven to 375° F.

MELT 2 cups morsels in small, heavy-duty saucepan over low heat; stir until smooth. Remove from heat.

COMBINE flour, baking soda and salt in medium bowl. Beat butter, brown sugar, granulated sugar and vanilla extract in large mixer bowl. Add eggs, one at a time, beating well after each addition. Beat in melted chocolate. Gradually beat in flour mixture. Stir in remaining 2 cups morsels. Drop by rounded tablespoon onto ungreased baking sheets.

BAKE for 8 to 9 minutes or until cookies are puffed. Cool on baking sheets for 2 minutes; remove to wire racks to cool completely
I frosted the cookies with a basic buttercream icing then sprinkled with crushed candy cane.

Frosting Ingredients:

  • 1/2 cup solid vegetable shortening
  • 1/2 cup (1 stick) butter or margarine softened
  • 1 teaspoon peppermint extract
  • 4 cups sifted confectioners' sugar (approximately 1 lb.)
  • 2 tablespoons milk

Instructions:


In large bowl, cream shortening and butter with electric mixer. Add peppermint. Gradually add sugar, one cup at a time, beating well on medium speed. Scrape sides and bottom of bowl often. When all sugar has been mixed in, icing will appear dry. Add milk and beat at medium speed until light and fluffy. Keep bowl covered with a damp cloth until ready to use.

Monday, November 28, 2011

Bridal Shower Cupcakes

Hey Crafty Friends-
 Well, the shower is over so as promised here are the pictures of my glorious cupcake creations.

The cakes were either chocolate devil's food with white vanilla butter cream or white cake with Hershey's chocolate frosting. The chocolate iced cakes were topped with sugar pearls and a "diamond" wedding ring. The white ones were decorated with three different toppers (I Do tag, heart, and "S" monogram) cut from the Tie the Knot Cricut cartridge. I am very pleased with how they turned out.......and they tasted great too!


Wednesday, November 9, 2011

LUCKY ME!

I was feeling a little crafty so I decided to use some products from Little Yellow Bicycle's Lucky Me line. I love anything Celtic inspired so when I took this picture of my daughter in her rainbow shirt I decided she is the pot of gold at the end of my rainbow. LUCKY ME!!!

Saturday, November 5, 2011

Thanksgiving Table Blog Hop

I am so happy to be a part of this hop. I love the way my project turned out. I hope you like it too.


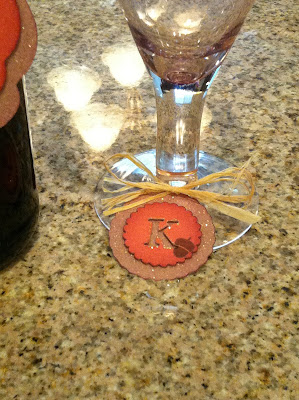
I created a wine bottle tag and glass charms using the Tie the Knot Cricut cartridge. I used the ivy tag rotated it vertically and cut it at 3 inches in orange cardstock. I then repeated the cut in the gold glitter cardstock but increased the size to 3.5 inches. All the pieces were inked on the edges using the Tim Holtz fall seasonal ink in Seedless Preserves.


I stamped three different leaf shapes from the Close to my Heart, Many Thanks stamp set in Old Olive, Chocolate Chip, and Seedless Preserves ink and cut them out. The sentiments from the same set were stamped in Chocolate Chip. All the layers were popped up on foam dots for dimension and tied to the bottle with raffia.


For the wine glass charms I used the same Tie the Knot cartridge to cut scalloped circles from the gold glitter cardstock at 2 inches, and the monogram scallop circles from the orange cardstock at 1.5 inches. Once again all edges were inked with Seedless Preserves, and an acorn was stamped in Chocolate Chip. Layered it all on foam dots and ties to the glass with raffia.

I hope you enjoyed your time at Craft Time and Cupcakes. Please follow on to the next blog on the list to see more great projects. Ya'll come back now, ya hear!


12. Kerri- http://crafttimeandcupcakes.blogspot.com/     <-------------- YOU ARE HERE